How to Replace a Power Supply (and buy a good one)
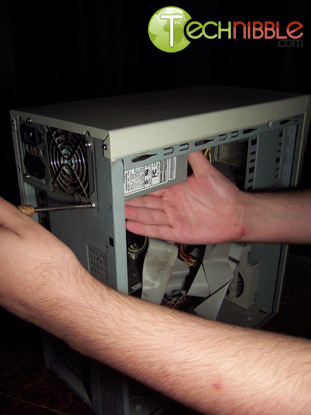
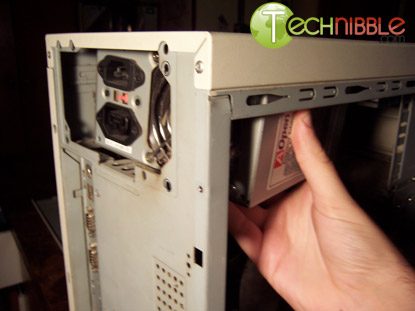
Supporting the power supply with one hand, remove the screws from the back and it should slide out of the case. Sometimes the power supply slides through the back panel and is attached differently, checking the on-line documentation for your case or PC supplier should provide the information needed.

Unscrewing the Power Supply

Unscrewing the Power Supply
Installation is the reverse. You’ll want to attach the power supply to the case first. Then you can begin connecting the various power cables paying using an order which best will enable routing the cables. Paying attention to the routing will pay dividends in the overall temperature of the computer as well as the energy use as today’s computers have variable speed fans controlled by temperature. Once all the connections are made double check them to make sure they are completely plugged in and secure, especially the motherboard connections.
Replace the mains power and keeping your hands clear of the open case, power up the computer. Check to make sure all the applicable cooling fans are running and that the PC boots. Power the computer back down, pull the mains power again and replace the service panel. Once everything is back in place, reboot the computer and using the power supply documentation, log into the PC Bios so you can set any power supply specific settings. Some of the newer supplies use variable speed fans with trigger levels which are set in the bios. You may also want to enable some other settings if you have the goal of increasing your computers power efficiency.
- Enable Hibernation If you’re like me and have a desktop which is in constant use the hibernation feature in newer PCs wakes up very quickly and has huge power savings potential.
- Configure hard drives after 15 minutes of inactivity. (Usually in the power menu which is a sub of the screen saver panel – right click on desktop). If you have quite a few drives like me, most of them aren’t being used except as needed.
- Check your computers bios to see if the cooling fans are variable speed or have a “quiet†setting. The temperature sensor in the motherboard controls this function.
- Replace your CRT monitor with an LCD one and configure it to sleep in the display menu rather than using a screensaver.
Some power supplies I find interesting:
The FSP-300 “Zen”, a fan-less / high efficiency model with 300 watts output. Torture Test Review
The Antec Phantom, another fan-less / high efficiency model with 500 or 350 watts output. Torture Test Review
If you plan to use one of the fan-less power supplies keep in mind that thermal output is always a reality. Without fans to carry the heat away the fan-less power supplies use heat sinks instead which transfer the heat to the inside of your PC case. You’ll want to monitor your computer’s temperature to make sure the case cooling design can handle the added ambient heat.
Written by Brian G
Session expired
Please log in again. The login page will open in a new tab. After logging in you can close it and return to this page.

In the hardware failures I’ve seen, the most common part has been the power supply. Then again, most of our computers are Dell. I shouldn’t be complaining, as they are so easy to change. A quick check with a PSU tester makes verification easy.
Same here, especially lately. In the suburbs neighboring my office they are building a major highway and the construction is causing frequent power surges to nearby houses. It has tripled the amount of jobs for power supply replacements.
The good place to figure the necessary PSU Wattage and Amperage is http://www.extreme.outervision.com/psucalculator.jsp
I use it all the time and results are pretty accurate.
I had an experienced on power supply failure before and I find really hard pointing it. The system runs normal but when using the cd/dvd rom drives it will crush and sometimes it will restart or shut down. I replace new cd/dvd rom and still has the problem. It really takes time to pin point the problem.
great reviews
Wow! Thank you! I always wanted to write in my site something like that. Can I take part of your post to my blog?
It’s also a good idea to carry a Volt Meter to check Amps and more then the PSU Tester can.
Just keep in mind that a PSU tester does not test the power supply under load, and thus may not be enough to diagnose a failing unit. I have come across a few units in my day that test fine, but the computer will still not post until I put in a new PSU.
So, what is a good way to pin point a faulty power supply unit? Cany anyone make a good suggestion?
The point that Scott Cairns has made is a very good point.